AV
- Bunche Hall
- Bunche 2221E - MQE Main
- Bunche 2249 - MQE Overflow
- Bunche 4357 - Polisci Conference Room
- Bunche 6275
- Bunche 7386
- Bunche 9383 - Econ conference room
- Bunche 9294 - Econ small conference room
- Haines Hall
- Haines 279 - Sociology Conference Room
- Haines 310
- Haines 314
- Haines 332 (Discourse Lab)
- Haines 352
- Haines A37 - Sociology lab
- Roaming Setup
- A7RIII Webcam via AV.io 4k
- A7RIII Webcam via CAM LINK 4K
- A7RIII Webcam via Sony Imaging Edge software
- AV Setup
- Lecture Capture Setup
- Rolfe Hall
- Royce Hall
Bunche Hall
Bunche 2221E - MQE Main
Equipment
-
- 1x LG86TR3DJ Touch Screen Display (Center)
- 2x LG 86in TV (Left and Right)
- PTZ Conference Camera (Vaddio) (Back pillar)
- 9 Speakers in ceiling
- 6 Microphones in ceiling
-
AV Cabinet
-
- Windows 11 PC
- Audio Interface
- Ethernet extension routing for HDMI
- OneLink Bridge Box (USB interface for Vaddio Camera and Shure Mics)
-
-
Lectern
-
- Lectern monitor to Local Windows 11 PC
- Keyboard and Mouse
- Anker USB-C Adapter for External Laptop Input
- Unifies HDMI, Ethernet, Touch Screen and OneLink Bridge.
- USB Ports
- Touch Screen - For now Windows only as it appears MacOS treats the display as a keyboard
- OneLink Bridge USB
- Microphone - Podium Mic (Mic 1) = Shure ULXD8 G50 (Freq 470-534)
- Lavalier Mic (Mic 2) = Shure ULXD1-G50 (Freq 470-534)
- Vaddio Camera
- Lectern monitor to Local Windows 11 PC
- Inside podium (on bottom) there is a base where the wireless Lav can be dropped in to charge (if they have the rechargeable batteries installed).
-
How-To
Local PC Setup
Ensure Desktop PC in the AV Cabinet is powered on.
- Make sure Local PC is selected on the Crestron Control Tablet
- If system was shutdown, it may take a few minutes for TVs to power up.
Using a laptop on the Lectern
Ensure the laptop is plugged into the Anker USB-C adapter. On macOS you may need to allow the USB-C device to connect. If a laptop does not have USB-C, please ask Amy to borrow the loaner HP Laptop.
- Once connected, grab the Crestron control tablet
- On the left of the tablet, select "Laptop"
- Your computer should show up on the monitors - this may take a few seconds (also make sure your computer is not asleep)
- Open Zoom
Audio
- For audio, you may have to select in your preferences "OneLink Bridge" for input and output in Zoom.
- Ensure on the Audio Tab of the Crestron Control Tablet that the appropriate microphone is unmuted and the recording levels are set high enough.
- Room microphones can be controlled by the Room mic button. Mics are active when rings are lit green. Mics are off when lights are off.
Video
- For video, you may need to select the OneLink Bridge in Zoom to use the camera at the back of the room.
- Go to the Camera tab on the Crestron Control Tablet to adjust camera positioning. Press and hold preset buttons for 3-5 seconds to save presets.
2249 Overflow Setup
Equipment
- Crestron Soundbar w/Camera
- LG TV
- Laptop
Back of Room
At the back of the room there are ports for a laptop to be connected to host a zoom session. Preferably this should be connected to a USB-C Hub
- Ethernet - for Zoom
- USB Host Cable - For Crestron SB1 Soundbar
- HDMI - Video for TV
- Plug USB-C Hub into Laptop
Audio
- Ensure that in Zoom the Crestron SB1 Soundbar is selected for audio input and output.
- Mute the microphone if overflow room isn't going to be participating.
Video
- Select SB1 Crestron Soundbar (Huddly) if you wish to use the camera in the soundbar.
Bunche 2249 - MQE Overflow
Equipment
-
- 1x LG Large screen
- Crestron labeled Sound Bar with camera "Huddly"?
-
Connections to monitor and Crestron sound Bar and Huddly
-
- Connections are in the back of the room
- One HDMI wall socket - Connects to the monitor - (HDMI 1 input)
- One USB Type B socket (for connecting to the Crestron Sound Bar/Huddly
- One USB Type A socket marked for "Power Only"
-
How-To
Connect TV
Must connect in the back of the room to the HDMI to present on the monitor
Connect to video camera and sound bar - for video conference
Must connect in the back of the room to the USB (Type B) connector for camera (and maybe audio from sound bar but wasn't working)
- In Zoom select Speaker: Echo Cancelling Speakerphone (Crestron-UC-Soundbar)
- Microphone was not working - but does show up named the same way
- Camera: In Zoom select Huddly IQ
Other notes on this room:
- No connections at front of room, only on back wall.
- Doesn't look like any power available along front wall. - There may be some on side wall.
- Two power outlets by the TV connections on back wall.
Bunche 4357 - Polisci Conference Room
Equipment
Epson 585W
Ceiling camera - worthless
An interactive board that they don't use, it's place on the white board
2 Built-in ceiling speakers
Notes:
Projector controls w audio near entry door to side of whiteboard.
Power
Power available in front of room (under the whiteboard) basically center, and more toward the door
Power in back of the room - one near the sink, and one close to center.
Ethernet
Appears to only have two, one on the back wall (close to the window) that is likely being used by the camera in the ceiling, and a second one on the side wall over by the sink, currently most likely used for a wifi access point in the ceiling.
Also one up by the podium straight down from the projector controls
Bunche 6275
Bunche 7386
Bunche 9383 - Econ conference room
Equipment
Hitachi CP-X5022WN projector (ceiling mounted) - released May 2013, discontinued Feb 2018 - 1024x768 (4x3) 5,000 lumensNow: Epson PowerLite L520U 1920x1200, 5,200 Lumen - released June 2021, installed March 2, 2023
Built-in Mac Mini (running Windows)
Monitor (on an arm attached to podium)
Keyboard and mouse for built-in Mac
Ancient Epson document camera setup (covered in dust) inside podium
4 Speakers on side walls (two toward the front, two in the back)
4x3 DaLite automatic screen - controlled from podium, or controls right by the front door
Connected Podium
Connected podium - has controls for Display On/Off, Volume, AV Mute, Screen up/down(down cap is missing) - Input selections on panel - Doc Cam, VGA, Mac laptop icon (thunderbolt written on it), Mac Built-in, two empty buttons.
There are also two USB ports on the podium - *will have to check what those actually connect to
Inside podium underneath there is a rack with - PowerBar, Extron XPA 1002 Amp, Extron switcher IN1606 (has 2 VGA and 4 HDMI inputs on back, 2 HDMI outputs A and B, A appears to be one used), Sonnet RackMac Mini - (rack mount for two Mac minis, only one in it)
Bunche 9294 - Econ small conference room
Equipment
Epson PowerLite 905 projector (ceiling mounted on BMS mount) - released March 2011, discontinued Jan 2014 - 1024x768 (4x3) 3,000 lumens (this projector is basically broken, yellow haze over everything - probably busted LCD or prismNow: Epson PowerLite L520U 1920x1200, 5,200 Lumen - released June 2021, installed March 2, 2023
Built-in Mac Mini (running windows)
Monitor (on an arm attached to podium)
Keyboard and mouse for built-in Mac
Ancient Epson document camera setup (covered in dust) inside podium
2 Little computer speakers stored in podium and hooked up to internal Mac Mini
Manual screen (80in wide)
Connectors for projector (VGA+Audio and HDMI) on column near podium - there is a second VGA+Audio jack, but that is not connected
Haines Hall
Haines 279 - Sociology Conference Room
Equipment
Epson 1985WU (ceiling mounted) - released Oct 2014 (Discontinued Jun 2017), 4,800 lumens, 1920x1200
Pull down screen 16x9 (92in Diagonal)
4 in ceiling speakers close in, kind of centered in the ceiling
Not always in the room, but they sometimes use an MXL ProConSeries 1 AC-404USB mic for zooms, also an Avaya HC020 (4K) camera with USB and HDMI out.
Wall mounted projector control panel Extron - w Volume knob, On/Off, HDMI, VGA, Mute, and one blank
Connections are made on the wall near the podium by the screen. Connections available: VGA (w Audio 3.5mm), HDMI, USB (which doesn't appear to go to anything)
How to Connect
- Turn Projector on via wall control panel
- Connect your computer via either the HDMI (preferred), or VGA wAudio (old) cable coming from the wall to the right of the screen (when facing screen)
- On the wall control panel select the cable you plugged into (probably HDMI)
Room Setup
This room is generally configured two different ways:
1) Large conference table style with a few chairs out on the walls (most of the time it's setup like this)
2) Tables are removed, and room is setup for a large presentation or talk, theatre style
Haines 310
Equipment
- Epson 595Wi - (released May 2014) installed ~Sept 2014
- Apple TV
- On wall speakers
- Control panel for projector inputs and volume
- Logitech Rally camera (put in during pandemic)
- USB Cable for connecting to Rally Camera
- USB Cable for connecting to Interactive Projector
- HDMI Cable
- VGA Cable
- USB-C to HDMI+VGA adapter (should be attached in the room, but may disappear from time to time)
*The below items were installed mysteriously during the pandemic, and are not used (mostly because the touchscreen really doesn't work, and these items weren't particularly needed not that they are bad pieces of equipment though):
- Touchscreen on an arm
- Metal box on the wall which has a Mac Mini (attached to the touchscreen)
- Wireless Sennheiser mic that connects to the Mac Mini (not used)
How-To
Connect to Projector
- Determine if you will be using Wireless (via AppleTV, only available for Macs and iPads), HDMI or VGA (older connection)
- Turn the projector on (control panel on wall) - it may take about 30 sec for it to warm up and show an image
- HDMI
- Plug the HDMI cable into your computer (either directly, or via adapter)
- Select HDMI on the control panel
- *Audio will go through the HDMI cable, and you will only be able to control volume at the wall controller
- Wireless (Only for Apple devices)
- Select "Apple TV"
- On computer go to Display Preferences (a few different ways to do this) one way on newer machines is in the upper right (just to the left of Date and Time) is a preferences icon
 - click it, and select Screen Mirroring - Choose "Room 310"
 - Your computer will ask for a 4 digit code - you should see the code on the Projector screen (if not, you may not have selected Apple TV on the wall control panel - it should be lit up)
- Enter the four digit code
- You should now see your computer screen up on the projector
- VGA (old connector)
- Plug VGA connector into your computer (or adapter), along with the audio cable (if you need audio)
- Select VGA on the control panel (it should light up) and you should see you screen
- *Audio volume can be controlled via your computer, or the wall control panel
- HDMI
Connect Camera
You connect to the Rally Camera through the USB cable labeled "Rally" or "Webcam"
- Plug the USB cable into you computer (you may need an adapter)
- Open Zoom or other application you'd like to use with the camera
- Launch your meeting
- In Zoom at the bottom of the meeting window, where you have a Camera icon and a little arrow, click the arrow and choose "Rally cam" - You should see an image from the camera
- There is a remote which can be used to control the camera
**If the image is jerky or blocky, or just doesn't look good, unplug the power for the box at the other end of the USB cable (on the wall) this should reset the camera and give you a much better image.
**There are also paper instructions I (Paul Connor) made a long time ago (minus camera stuff) in the room
Haines 314
Equipment
- Epson 595Wi - (released May 2014) installed ~Sept 2014
- Apple TV
- On wall speakers
- Control panel for projector inputs and volume
- Logitech Rally camera (put in during pandemic) on Back Wall
- USB Cable for connecting to Rally Camera
- USB Cable for connecting to Interactive Projector
- HDMI Cable
- VGA Cable
- USB-C to HDMI+VGA adapter (should be attached in the room, but may disappear from time to time)
How-To
Connect to Projector
- Determine if you will be using Wireless (via AppleTV, only available for Macs and iPads), HDMI or VGA (older connection)
- Turn the projector on (control panel on wall) - it may take about 30 sec for it to warm up and show an image
- HDMI
- Plug the HDMI cable into your computer (either directly, or via adapter)
- Select HDMI on the control panel
- *Audio will go through the HDMI cable, and you will only be able to control volume at the wall controller
- Wireless (Only for Apple devices)
- Select "Apple TV"
- On computer go to Display Preferences (a few different ways to do this) one way on newer machines is in the upper right (just to the left of Date and Time) is a preferences icon - click it, and select Screen Mirroring - Choose "Room 314"
- Your computer will ask for a 4 digit code - you should see the code on the Projector screen (if not, you may not have selected Apple TV on the wall control panel - it should be lit up)
- Enter the four digit code
- You should now see your computer screen up on the projector
- VGA (old connector)
- Plug VGA connector into your computer (or adapter), along with the audio cable (if you need audio)
- Select VGA on the control panel (it should light up) and you should see you screen
- *Audio volume can be controlled via your computer, or the wall control panel
- HDMI
Connect Camera
You connect to the Rally Camera through the USB cable labeled "Rally" or "Webcam"
- Plug the USB cable into you computer (you may need an adapter)
- Open Zoom or other application you'd like to use with the camera
- Launch your meeting
- In Zoom at the bottom of the meeting window, where you have a Camera icon and a little arrow, click the arrow and choose "Rally cam" - You should see an image from the camera
- There is a remote which can be used to control the camera
**If the image is jerky or blocky, or just doesn't look good, unplug the power for the box at the other end of the USB cable (on the wall) this should reset the camera and give you a much better image.
**There are also paper instructions I (Paul Connor) made a long time ago (minus camera stuff) in the room
Haines 332 (Discourse Lab)
Haines 332 (Discourse Lab)
Equipment
- Epson PowerLite G6450WU - (released June 2013, Discontinued April 2017)
- Apple TV (in the Credenza)
- On wall speakers
- HDMI Cable
- VGA+audio cable
How-To
Connect to Projector
- Determine if you will be using Wireless (via AppleTV, only available for Macs and iPads), HDMI or VGA (older connection) - For HDMI (cable) or Apple TV, make sure the correct cable is plugged into the wall socket (to the left of the credenza)
- Turn the projector on (Remote control usually on the credenza) - it may take about 30 sec for it to warm up and show an image
- HDMI
- Plug the HDMI cable into your computer (either directly, or via adapter)
- Select HDMI on the remote
- *Audio will go through the HDMI cable, and you can control the audio via the remote
- Wireless (Only for Apple devices)
- Select HDMI on the remote
- On computer go to Display Preferences (a few different ways to do this) one way on newer machines is in the upper right (just to the left of Date and Time) is a preferences icon - click it, and select Screen Mirroring - Choose "Discourse Lab"
- Your computer will ask for a 4 digit code - you should see the code on the Projector screen (if not, either HDMI hasn't been selected on the remote, or the Apple TV hasn't been connected to the wall, or the Apple TV needs to be turned on/woken up by hitting Menu on the Apple TV remote)
- Enter the four digit code
- You should now see your computer screen up on the projector
- VGA (old connector)
- Plug VGA connector into your computer (or adapter), along with the audio cable (if you need audio)
- Select VGA on the projector remote
- *Audio volume can be controlled via your computer, or the projector remote
- HDMI
Haines 352
Equipment
- Epson Powerlite L530U (Released June 2021, installed Sept. 2022) (previous projector broke over the summer that one was installed ~10/2013)
- Apple TV
- Blu-Ray player
- VHS deck
- PowerBar - Power Distribution for the whole rack - Must be turned on
- In ceiling speakers
- Sennheiser Wireless receiver
- Input switch selector for projector inputs
- Amp for controlling audio inputs and volumes
- Logitech Rally camera (put in during pandemic) on ceiling next to projector
- DTEN Monitor - Zoom appliance
- USB Cable for connecting to Rally Camera (Labeled "Zoom")
- HDMI Cable
- VGA Cable
- Remotes
- Projector
- BluRay
- VHS
- Rally Camera
- Apple TV
How-To
Connect computer to Projector
- Determine if you will be using Wireless (via AppleTV, only available for Apple Devices), HDMI or VGA (older connection)
- Turn the projector on (via Projector remote) - it may take about 30 sec for it to warm up and show an image
- HDMI
- Plug the HDMI cable into your computer (either directly, or via adapter)
- Select HDMI on the control panel in the rack
- *Audio will go through the HDMI cable, and you will only be able to control volume at the Audio Amp
- Wireless (Only for Apple devices)
- Select "Apple TV" on the video switch
- On computer go to Display Preferences (a few different ways to do this) one way on newer machines is in the upper right (just to the left of Date and Time) is a preferences icon - click it, and select Screen Mirroring - Choose "Reading Room"
- Your computer will ask for a 4 digit code - you should see the code on the Projector screen (if not, you may not have selected Apple TV on the video switch - it should have a little light on)
- Enter the four digit code
- You should now see your computer screen up on the projector
- VGA (old connector)
- Plug VGA connector into your computer (or adapter), along with the audio cable (if you need audio)
- Select VGA on the video switch (light above should turn on) and you should see you screen
- *Audio volume will be controlled via your computer, and the Amp.
- HDMI
Note on Audio control in Room 352
Audio goes through the Amp in the rack - most control of audio is through this Amp
You have control for individual input channels (Laptop or Computer, Wireless mic etc.) and the general overall volume control (knob at far right). Some common markers for volume level of wireless mics (if being used) are labeled. If the wireless mics are turned up too high you will get feedback.
Connect to Rally Camera
You connect to the Rally Camera through the USB cable labeled "Zoom"
- Plug the USB cable into you computer (you may need an adapter)
- Open Zoom or other application you'd like to use with the camera
- Launch your meeting
- In Zoom at the bottom of the meeting window, where you have a Camera icon and a little arrow, click the arrow and choose "Rally cam" - You should see an image from the camera
- There is a remote which can be used to control the position of the camera - There are two presets (one called "Front" which gives an overall view of the front of the room including the podium, screen, and a bit to the side of the screen. The other "Podium" give a view primarily of the podium area (where the podium generally is) this is good for when doing a Zoom lecture where the screen is being shared directly (the BEC setup).
- Be sure to select your computer for the Microphone
**If the image is jerky or blocky, or just doesn't look good, unplug the power for the box at the other end of the USB cable (on the wall) this should reset the camera and give you a much better image.
Connect BluRay or VHS
- Turn on the BluRay or VHS deck
- Select your device on the video switcher
*Note: These inputs, especially the VHS are going through some conversion, and so may not be of the highest quality
**There are also paper instructions (Paul Connor and Tyler Lawrence) made a long time ago (minus camera stuff) in the room
Haines A37 - Sociology lab
Equipment
Epson 1810p max resolution 1024x768 (Discontinued in 2010)7_2024 - Epson L530U Installed (1920x1200)- Wall input for projector with
VGA+Audio(1/8in), and composite video inputs (Video plus L+R audio)7_2024 - 1xHDMI to projector + Audio 1/8in (connected to projector out for speakers on desk) - Projector remote - power and volume control (also device and speakers can control volume)
- DaLite 4:3 screen hung from skylight area
- Speakers - There is a Subwoofer and satellite speaker setup at the instructor table.
How-To
Connect to Projector
-
- HDMI
- Built-in/desktop PC, and Laptop HDMI cable go into HDMI switch.
- Select which device to view on the switcher
- HDMI
Power runs along the sides of the room, the room is more of a computer lab, but setup oriented toward the front, for presenting and teaching.
The switch box needs to be powered, it's plugged in on the left (if looking out into class from instructor desk), first row of desks, it is labeled. On the switch, there is a red light to indicate power is on, and a green light displays which input is selected.
Roaming Setup
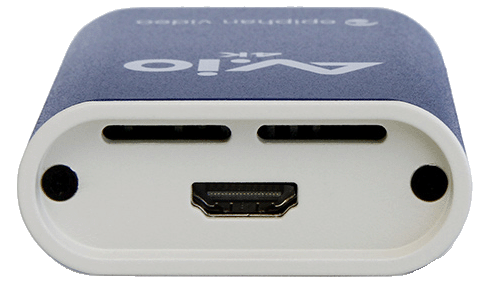
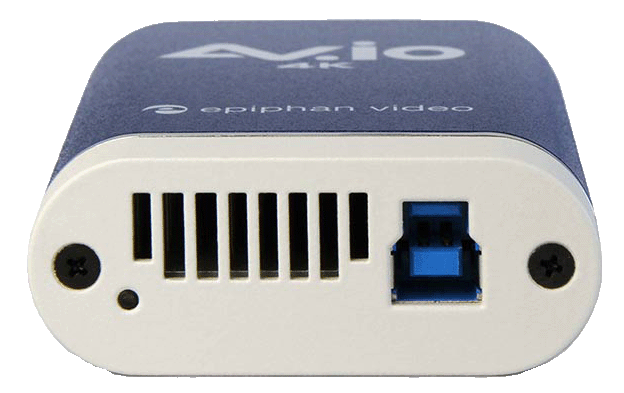
A7RIII Webcam via AV.io 4k

** This capture method will capture audio from the A7RIII (Built-in mic on camera, or another mic plugged into the camera)
** This capture method does not require any plugins or additional software (besides Zoom or other conferencing software)
Items needed
- AV.io 4k
- USB 3.0 Cable (one end needs to be USB 3.0 Type B, other end can be the more common Type A, or USB-C)
- An HDMI Cable - Full size to HDMI-Micro (on the A7RIII)
1) Connect the AV.io 4k to your computer by plugging in the USB on the AV.io, and plugging the other end into your computer
2) Connect your HDMI cable to the AV.io
3) Connect the other end of the HDMI cable to the Sony A7RIII Micro HDMI port (on the left side of the camera under the top back flap)
4) On A7RIII - Turn the wheel on top of camera to Movie Mode (film strip icon) *You may still get an image in other modes, but they won't fill up the widescreen view, and it won't pass audio
5) Turn A7RIII on if not already on
6) Open Zoom - Either in preferences > video, (or in a launched meeting under the video icon) select AV.io 4K *If using a mic connected to the camera, also select AV.io 4K Audio for the Microphone input
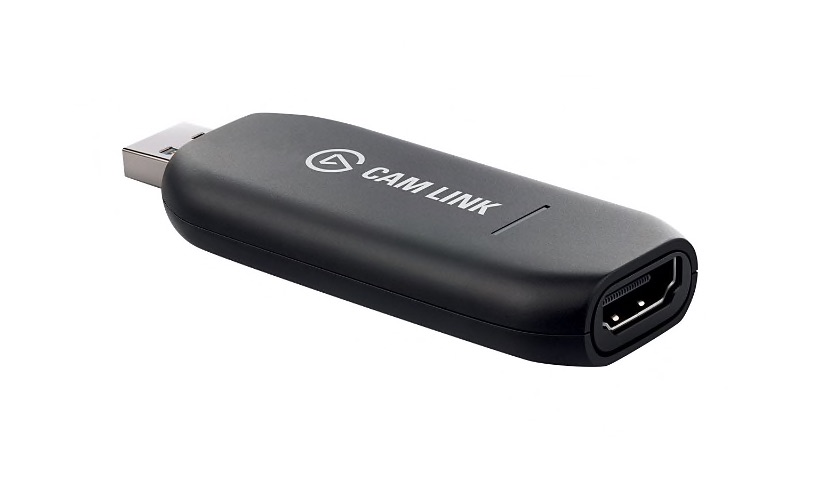
A7RIII Webcam via CAM LINK 4K
** This capture method will capture audio from the A7RIII (Built-in mic on camera, or another mic plugged into the camera)
** This capture method does not require any plugins or additional software (besides Zoom or other conferencing/recording software)
Items needed
- Cam Link 4k
- Cam link has a built-in USB-A plug (traditional USB - see image above), you may need an adapter to USB-C for your computer (i.e. any Mac Laptop in last few years)
- An HDMI Cable - Full size to HDMI-Micro (on the A7RIII)
1) Connect the Cam Link 4k to your computer by plugging in the USB end into your computer (may need an adapter)
2) Connect your HDMI cable to the Cam Link
3) Connect the other end of the HDMI cable to the Sony A7RIII Micro HDMI port (on the left side of the camera under the top back flap)
4) On A7RIII - Turn the wheel on top of camera to Movie Mode (film strip icon) - And turn on Camera *You may still get an image in other modes, but they won't fill up the widescreen view, and it won't pass audio
5) Open Zoom - Either in preferences > video, (or in a launched meeting under the video icon) select Cam Link 4K *If using a mic connected to the camera, also select Cam Link 4K for the Microphone input
**If you switch modes on A7RIII - via top ring, or in menus while connected in a meeting, Zoom may turn off your video, just click the start video icon again to restart it.
A7RIII Webcam via Sony Imaging Edge software
Items needed:
- Sony A7RIII Camera
- USB-C cable
- Computer
- Optional but very likely needed - a mini or full size tripod capable of holding the A7RIII
Download and install newest version of Sony Imaging Edge Webcam -
http://support.d-imaging.sony.co.jp/app/webcam/en/download/
If using a SSCERT Media machine, this should already be present.
*If installing, be sure to restart your computer after you've installed the software.
Compatible with
- Microsoft® Windows® 10 (64-bit) operating system, Windows 11
PC with Intel or AMD processor (The software will not run on PCs based on ARM processors) - Apple® macOS® 10.14, macOS 10.15, macOS 11, macOS 12
Audio will not go through the camera, you will have to use the built-in mic on your computer, or an external microphone connected to your computer Please note this can sometimes lead to slight audio sync issues. Frame rates may also not be perfect, image can seem a little slow or behind.
On Camera:
6) On the circular dial on top of the camera, set it to Movie Mode (film strip icon)
7) On Computer - Before connecting the camera to your computer make sure "Imaging Edge Desktop Remote" software is *Not running
8) With camera on, connect USB-C cable to camera on left side (if facing camera screen) you may have to open flaps to reveal the port, USB-C port is behind bottom flap.
9) Connect the other end of the cable to your computer
10) Launch Zoom - Go to Preferences/Settings > Video and under camera select "Sony Camera(Imaging Edge)" - You should see an icon for Imaging Edge Webcam come up on the screen briefly, and then the image from your camera (make sure your lens cap is off)
11) If you see the image, you should be ready to start your meeting/recording! Be sure to select your audio source as well, as no audio will come through the camera.
AV Setup
Major Components
- MacBook Pro
- Rally Camera
- C920 Camera
- Zoom H6 Audio Interface
- Shure Audio Amp
MacBook Pro Notes
- USB to Ethernet - connect to Zoom and C920
- USB C - Rally Camera
- USB C - Ethernet
Zoom H6 Notes
- USB to Ethernet
- Headphone out - connect to Shure Audio Amp
Shure Audio Amp Connections
- Power to
Lecture Capture Setup
Zoom on personal computer
1) Open Zoom
2) Click New Meeting (if you are recording to upload later), or join or start a meeting if you will be recording an active class.
3) If it asks to "Join with Computer audio" click that.
4) You should now see your video feed from your computer's camera
5) To begin recording, Either click the "Record" button (and select to this computer or to the cloud), or if your window is small you may have to click on the three dots "More" (and select "Record to this computer" or "Record to the Cloud".
If you are using an external Camera (including builtin ceiling/wall mount cameras) make sure that you have it connected, and selected.
1) To select an external video source, (make sure it is physically connected) click the small arrow to the right of the camera icon and select your camera
2) To select an external audio source, click the small arrow to the right of the microphone icon and select your audio device (both Microphone (input), and Speaker (output)).
Specialized setups will be added below: